Denmark Strait 1941: Hood vs Bismarck Wargame Scenario
24 May 1941 — Hood vs Bismarck in the waters between Iceland and Greenland. A short, violent gun action lasting twenty minutes that produced one of the most dramatic single moments of the Second World War at sea — and one of the best capital-ship wargame scenarios ever designed.
HMS Hood, photographed shortly before the action — her last known image before she was lost on 24 May 1941. Imperial War Museums collection, Crown copyright expired / public domain.
Historical Context
Operational context: the Denmark Strait between Iceland and Greenland, May 1941. Wikimedia Commons, public domain.
The Denmark Strait action was the knife-edge surface phase of Operation Rheinübung — Bismarck and Prinz Eugen's breakout attempt into the Atlantic. British heavy cruisers Suffolk and Norfolk made first visual contact on 23 May in poor visibility close to the ice edge (mist near land/ice, intermittent snow and rain squalls), then maintained radar contact through the night while the battlecruiser force closed to deliver a daylight gun action.
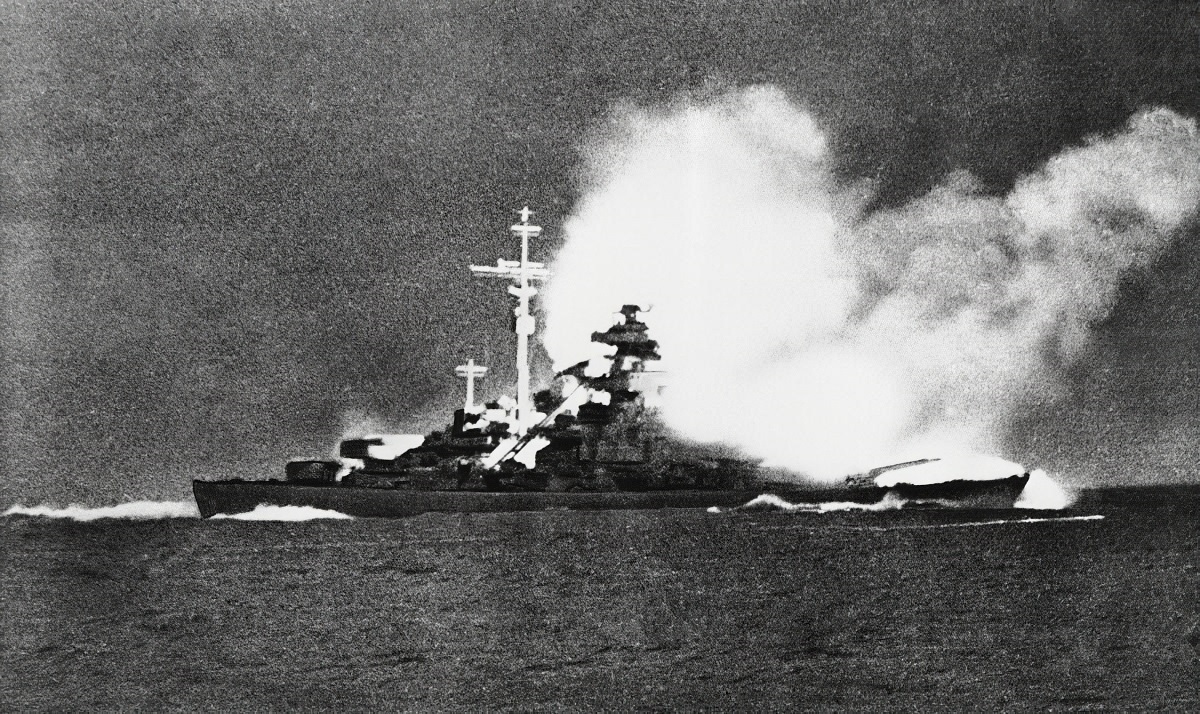
The immediate result was a decisive German tactical victory: HMS Hood was destroyed by a catastrophic magazine explosion within minutes of the action opening; HMS Prince of Wales, hit repeatedly and suffering serious turret and fire-control failures, disengaged under smoke. The operational picture was more complex — Prince of Wales scored at least three hits on Bismarck, one of which caused a fuel/oil leak that would ultimately force the German ships to abandon the breakout and seek a French port, setting up the pursuit and Bismarck's destruction three days later.
Three Hinge Moments (Why This Works as a Scenario)
- Initial target identification and target allocation The British briefly treated the lead ship as Bismarck when it was actually Prinz Eugen — a confusion amplified by the German formation having Prinz Eugen ahead at that stage. Prince of Wales' gunnery narrative records last-moment target-shift signalling just before opening fire. This is a built-in fog-of-war mechanic: pre-plotting target allocation, optional mis-ID rules, and penalties for late switching.
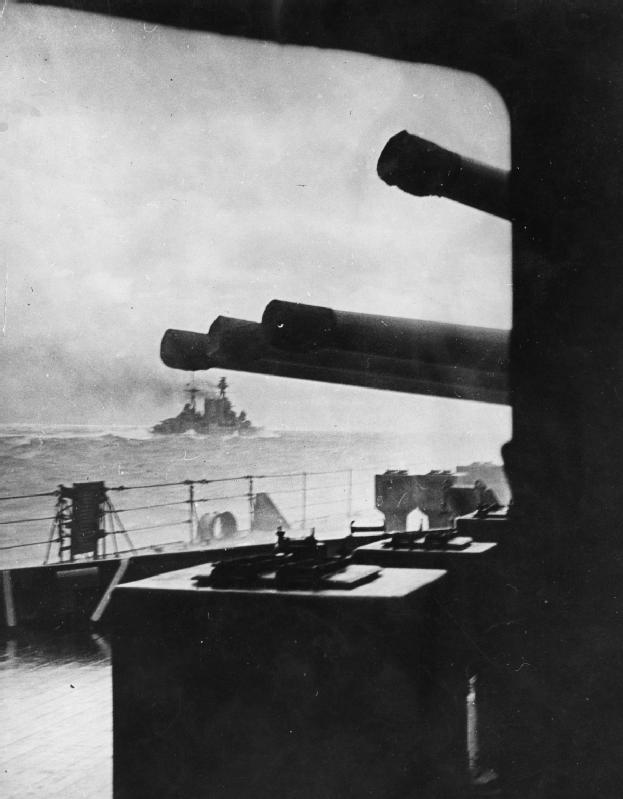
- Course changes designed to unmask after arcs After the opening end-on/oblique approach, the British executed turns to port to bring more guns to bear — near the moment Hood received the decisive hit. This is an explicit risk calculus in game terms: accept restricted arcs early to reduce incoming fire solution time, or open earlier to maximise weight of fire at the cost of longer exposure?
- Prince of Wales' mechanical and drill-state limitations Quad turret defects, interlocks, radar interference, and other "new ship" issues materially reduced British effective fire output at the worst time. The gunnery appendix documents multiple turret/gun failures and a jam during the action — exactly the sort of friction that is hard to model cleanly unless you commit to scenario rules.
Orders of Battle
🇬🇧 Royal Navy
| Ship | Class | Battery | Displacement | Speed |
|---|---|---|---|---|
| HMS Hood | BC (Admiral) | 8 × 15″ | ~46,680 t deep load | ~28.8 kts (1941) |
| HMS Prince of Wales | BB (KGV) | 10 × 14″ | ~43,786 t deep load | ~28 kts |
| HMS Norfolk | CA (County) | 8 × 8″ | ~9,925 t standard | ~32 kts |
| HMS Suffolk | CA (County) | 8 × 8″ | ~9,750 t standard | ~31.5 kts |
| Destroyers ×6 | DD | Torps + guns | Electra, Anthony, Echo, Icarus, Achates, Antelope | |
🇩🇪 Kriegsmarine
| Ship | Class | Battery | Displacement | Speed |
|---|---|---|---|---|
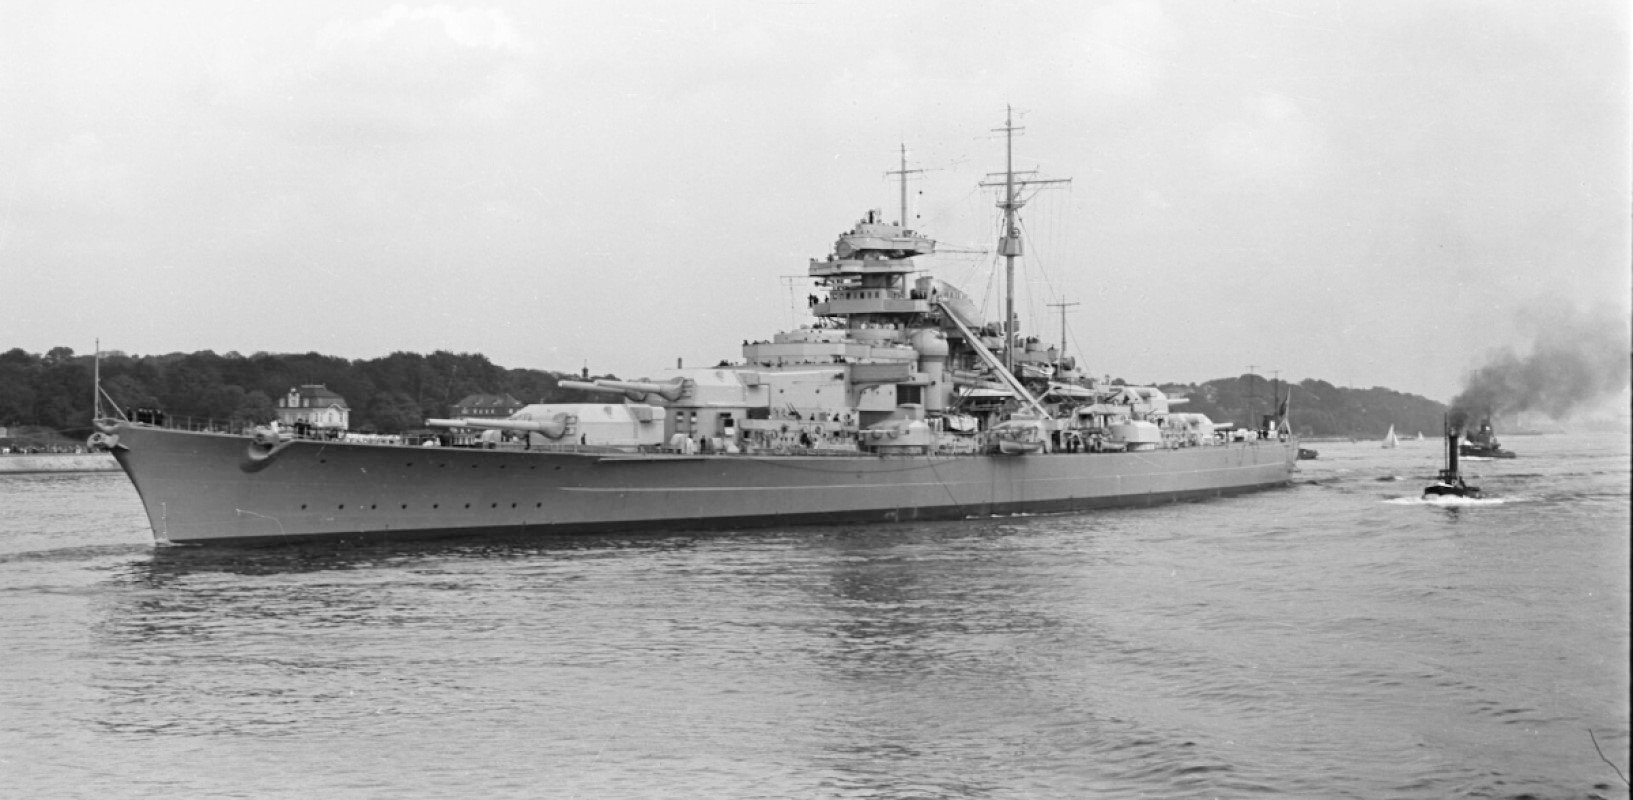
| Bismarck | BB | 8 × 38 cm (15″) | ~41,700 t standard | ~28 kts |
| Prinz Eugen | CA (Hipper) | 8 × 20.3 cm (8″) | ~16,970 t standard | ~32 kts |
Prinz Eugen led the German formation at action opening — the source of the British identification confusion.

Losses and Critical Damage
- HMS Hood — hit early; fire observed spreading aft; catastrophic magazine explosion between after funnel and mainmast; sank within 3–4 minutes. 1,415 lost, 3 survivors (recovered by Electra).
- HMS Prince of Wales — Bismarck shifted fire quickly after Hood's loss; four 15″ plus additional smaller shells; lost key directors; underwater damage; one 14″ turret jammed; disengaged under smoke at 0613.
- Bismarck — three hits confirmed (per Suffolk's report in official dispatch); at least one caused a fuel and oil leak, leaving a visible wake and constraining endurance — the proximate cause of the decision to abort the breakout.
Tabletop Considerations
Player-Facing Decisions
- Approach geometry and time-to-broadside. The historical British intent was to close range fast — the dispatch records Hood and Prince of Wales steering to close "as fast as possible." In game terms: when do you turn to full broadside, accepting the exposure cost?
- Target selection under identification uncertainty. The last-minute target shift signal is a natural scenario rule — pre-plot targets, optional mis-ID rolls, penalties for switching after the opening turn.
- When to disengage. After Hood's loss, both sides face credible choices: German pursuit or mission preservation; British re-engagement or survival-and-shadow. The disengage decision is the scenario's central drama.
- Shadowing vs fighting. Extend the scenario backwards to the 23 May contact phase and the victory condition becomes as much about information as hull points.
Scale and Duration
The gunnery action opened at roughly 25,000 yards and Prince of Wales ceased fire at approximately 14,600 yards — a range change of about 10,000 yards in twenty minutes. This is exceptionally manageable for one-session play while still featuring meaningful range change, arc management, and damage control. 1:3000 to 1:6000 miniatures fit best: the opening range can be represented at club-table scale without compressing the geometry. See our ship model reviews for suitable Navwar and GHQ ranges.
Scale Maths for 1:3000 Play
At 1:3000, 1 cm on the table ≈ 30 m in reality — which means 10,000 yards (9,144 m) would be ~305 cm at true range scale. Too wide for most club tables. The standard solution: keep miniature scale at 1:3000 for silhouette recognition, but use a compressed ground scale (1″ = 1,000 yards). This is justified by the battle's own timeline — range collapses from 25,000 to 14,600 yards in just 20 minutes, so you need a scale that lets it close meaningfully in a handful of turns.
| Event | True distance | Table at 1″ = 1,000 yds |
|---|---|---|
| Opening fire | ~25,000 yds (22.9 km) | 25″ (63.5 cm) |
| Hood lost (est.) | ~18,000–20,000 yds | 18–20″ |
| PoW disengages | ~14,600 yds (13.4 km) | 14.6″ (37 cm) |
Lighting and Visibility
The "sunrise silhouette" popular narrative is not strictly accurate. Sunrise was around 0345 local time; the sun was already several degrees up by the time the gun action opened, skies overcast, with both sides sufficiently illuminated for initial visual detection at roughly 20 nautical miles. Model visibility as good-but-grey rather than a night-to-day transition, with low sun still able to influence contrast and spotting.
Weather and sea state: winds around Force 3 easterly, moderate swell and spray. Spray affected forward turrets at speed — a factor explicitly noted in Prince of Wales' combat documentation and directly relevant as a gunnery modifier. The destroyers trailed because heavy seas made station-keeping at high speed difficult.
Plausible Alternative Outcomes
- Hood survives the "one unlucky hit." If the catastrophic magazine event does not occur, the battle remains a 2v2 gunnery duel at closing range where small differences in hit timing, fire spread, and manoeuvre matter hugely.
- Prince of Wales' heavy-gun performance improves. Varying "turret reliability" and "radar range availability" can swing outcomes dramatically without any ahistorical ship swaps.
- Bismarck presses after Hood's loss. Even a tactical win could be pyrrhic given Bismarck's oil/fuel endurance damage — perfect for campaign play where breaking off vs continuing has concrete downstream effects.
After-Action Report — Composite Club Run
We set up at 05:53 with both sides doing roughly 28 knots: Germans on a broadly south-westerly heading, the British crossing in to close rapidly. The British plan was classic Holland — hold fire until range felt "settled", then turn to unmask and overwhelm with weight of metal. The German plan was simpler: accept the closing fight, concentrate on Hood early, and break contact once the British geometry threatened a full broadside. The first five minutes felt like a gunnery demonstration — everyone could see the range collapsing and knew the first clean straddle would decide the tempo.
On Turn 3 the British committed to the unmasking turn. That's the decision Denmark Strait forces on you: keep the approach safe-but-undergunned, or swing to bring the after turrets in and accept that you are mid-evolution at exactly the moment the enemy has a fresh firing problem. When the German player landed a heavy hit into Hood during that window, the table chatter instantly flipped from confident to grim.
Prince of Wales then had to decide whether to stay in and trade 1v2 or disengage. Her gunnery output degraded at exactly the wrong moment — the "new ship" problem — and concentrated German fire punished it. The British turned away under smoke at roughly the historical break-off time, while trying to keep a line of bearing for shadowing. Whether you call that "timid" or "correct" is exactly why Denmark Strait stays interesting for experienced players: the table argument is the same one the real commanders had when they wrote about turret trouble and the risks of continuing single-handed against two efficient opponents.
This is a composite representative run written in NWS club voice. Prince of Wales' turret reliability rule triggered in every session we ran — when it bit early, the British player shifted from damage-race to shadow-and-survive. If you run it, note your own trigger rate; it's the single most revealing data point in post-game discussion.
Runnable Scenario
A system-agnostic setup that translates directly into General Quarters, Victory at Sea, Naval Thunder, or your house system.
Map & Scale
- Start clock
- 05:52 (Hood opens fire)
- Table size
- 6′ × 4′ recommended for 1:3000 / 1:2400 play; open water
- Ground scale
- 1 inch = 1,000 yards
- Turn scale
- 2 minutes per turn
- Movement
- 28 knots ≈ 1.9″ per turn; hex variant: 1 hex = 1,000 yards (~2 hexes/turn)
- Ice edge
- Optional: 4–6 ice hazard markers along one long edge to simulate constrained manoeuvre
At-a-Glance Timeline
Course Changes — Historical Record
From the HMS Hood Association range/times documentation. Use as scripted events or player context; the headings explain why arc management and relative bearing mattered so much.
| Time | Course | Ship / Force | Notes |
|---|---|---|---|
| 05:35 | 240° | British (Hood) | Closing — forward arcs only |
| 05:37 | 280° | British | Adjustment before opening fire |
| 05:49 | 300° | British | Further swing to port |
| ~05:32 | 220° | German (Bismarck/PE) | Break-out heading, south-westerly |
| 05:55 | 280° | British | Continuing turn |
| ~06:00 | 260° | British | A-arcs unmasking turn — Hood lost in this window |
| 06:13 | — | Prince of Wales | Disengages under smoke at ~14,600 yds |
Initial Deployment (05:52)
Formation note: Prinz Eugen is ahead of Bismarck at the opening — this is the source of the British identification confusion and should be set up exactly as shown. Separation between Hood and the lead German ship: 25″ (= 25,000 yards at ground scale).
Victory Conditions
Three-tier structure prevents "Götterdämmerung incentives" where a losing side has nothing to gain from preserving ships.
Special Rules
- Target identification friction (turns 1–2). For the first 2 turns, or until range drops below 20,000 yards, British gunnery at the German line suffers a targeting penalty unless the British player explicitly allocates actions to confirm identity. Historically the lead ship was mistaken for Bismarck and fire allocation had to be corrected under fire.
- Prince of Wales unreliable main battery. Implement a per-turn reliability check for the two quadruple turrets. The gunnery documentation records defects, interlocks, and a jam during the action. The published Victory at Sea scenario includes this as an explicit optional rule — adopt the same mechanic regardless of which system you use.
- Destroyers as optional delayed module. If you include the British destroyers, require them to enter no earlier than Turn 6, or start off-table as "trailing." Their value is torpedo threat zones, smoke, and post-disengagement screening — not the gunnery duel itself.
Ruleset Coverage
General Quarters 3
Good fit — community scenariosGQ3's mechanics for radar/spotting, damage control, turret reliability, and morale cover all the decisive elements. The Tin Cans and Battlewagons: GQ Edition supplement explicitly includes Denmark Strait. Community practice also uses it as a standard tutorial action. See Rules Online for GQ links.
Victory at Sea
Official scenario (p.83)Warlord Games' rulebook includes an official Denmark Strait scenario with an optional rule for Prince of Wales' unreliable main battery. Part of a chain of three linked Bismarck scenarios (Denmark Strait → pursuit → last stand) — ideal for a club mini-campaign.
Naval Thunder: Bitter Rivals
Official scenario in ToCThe WW2 expansion includes a full Denmark Strait scenario with defined order of battle, deployment maps, and scenario-specific special rules including Prince of Wales turret faults. Lowest referee workload of the three main options.
Seekrieg 5
Active community scenariosThe Seekrieg community runs Denmark Strait regularly; the site hosts published after-action reports. Strong scenario maturity even without a formal publisher packet.
Cruel Seas / Narrow Seas!
Not suitable for core actionBoth systems focus on small craft. Cruel Seas is 1/300 MTB-to-escort scale; Narrow Seas! covers only ships up to destroyers. Neither handles capital-ship gunnery. Usable only for destroyer-screen sub-actions.
📄 In the AGB Archive
Battlefleet and AGB — the NWS journals — have covered WW2 surface-action scenarios, capital-ship gunnery friction, and Bismarck-era campaign rules across several issues. Competitors can copy a stat block; they can't copy thirty years of club experience.
- Browse the full AGB archive (2007–2019) — search issues for "capital ship", "surface action", "scenario rules"
- Fleet Data — ship reference data drawn from NWS naval PDFs
- GQ Ship Data Reference — General Quarters stat blocks for WW2 ships
- NWS Scenarios — published scenario PDFs including WW2 surface actions
Further Reading
Online Resources
- HMS Hood Association — Denmark Strait Research — primary-source transcriptions (ADM 234/509 dispatches and boards of inquiry), Prince of Wales gunnery appendix, range/time breakdowns, and a dedicated reconstructed environment page useful for setting explicit scenario modifiers (spot ranges, smoke persistence, destroyer arrival delays).
- Royal Museums Greenwich — concise institutional account emphasising the battle's operational consequences and contextualising Prince of Wales' newness and workmen-still-aboard status.
Frequently Asked Questions
-
What sank HMS Hood?
Hood was struck during the gunnery duel and destroyed by a catastrophic magazine explosion placed by official dispatches between the after funnel and mainmast, shortly after the port turns intended to unmask her after guns. She sank within 3–4 minutes; only three survivors were recovered.
-
How many ships fought at the Battle of the Denmark Strait?
The core gunnery duel was between four heavy units: Hood and Prince of Wales on the British side, Bismarck and Prinz Eugen on the German. HMS Norfolk and HMS Suffolk were present as shadowing cruisers, and six British destroyers were in the wider force but trailing in heavy seas and not up in the gun duel at first light.
-
Who won the Battle of the Denmark Strait?
Tactically the Germans won: Hood was sunk and Prince of Wales driven off. Operationally the result was less clear — Prince of Wales' hits caused a fuel/oil leak that forced Bismarck to abort the breakout, directly setting up the pursuit and Bismarck's destruction three days later.
-
When did the battle start and how long did it last?
Hood opened fire at approximately 05:52 on 24 May 1941; Prince of Wales followed around 05:53. Hood was destroyed around 06:00–06:05 and Prince of Wales broke off under smoke at 06:13 — a decisive gun action of roughly twenty minutes.
-
What scale miniatures are best for a Denmark Strait wargame?
1:3000 to 1:6000. At 1:3000 on a 6′ × 4′ table with 1 inch representing 1,000 yards, the opening 25,000-yard range is representable without compressing the geometry. Both Navwar (1:3000) and GHQ (1:2400) produce suitable models for all four capital ships — see our ship model reviews.
More Historical Battles
This article is part of our growing Historical Battles series — scenario notes for naval wargamers covering engagements from the Age of Sail to the Cold War. Related reading: NWS Scenarios · Rules Online · Fleet Data · Ship Model Reviews.